ShopDreamUp AI ArtDreamUp

Deviation Actions


Suggested Deviants


Suggested Collections


You Might Like…


Description
Ok, so not really a tutorial, but a sweet commenter asked me if I'd do one... And since I don't think I'm good enough to actually teach anyone how to do anything on Photoshop (there are MANY great digital tutorials out there already) I thought that instead of being rude or ignorant, I'd give a step by step as to how I work.
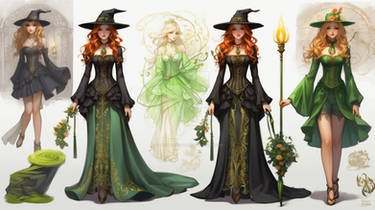
So, here's a couple of screenshots from my last work, 'Professor Trelawney'.
1: Pose.
This is where I very loosely sketch out the initial pose of the character. This can either be really quick or really time consuming depending on how clear a vision I have of what I want my character to be.
2: Rough Sketch.
Here, once I've found a pose I'm happy with, I begin to 'flesh out' the details of the piece. Because in this particular one the costume is very detailed and important, I began doing this first. Usually I start with the face if the rest of the figure is less detailed.
3: Refined Sketch.
This is, thus far, the most time consuming part. On a new layer, filled with white on 'multiply' mode, I use the BURN tool in Photoshop to define and refine the drawing. I use the burn tool because I feel it most accurately emulates the humble pencil, and I can get the most out of it.
4: Lineart.
Probably the most tedious part of any drawing, but also the most satisfying once completed. Working at high zoom so as to get as smooth lines as possible (never work at under 100% zoom, you'll get bumpy lines, no matter how steady your hand is). I also use the PEN tool when the lines are really long and sweeping to get a steady result.
5: Flat colours.
Simple really, I start with base colours, then add in one or two darker tones and a couple of lighter ones. I use a different layer for each colour, lock the transparency once I've coloured it and then apply shadows. Highlights I always do last. At this stage I block out all the colours and shading so I can get an overall view of how it meshs together. *squinting makes the colours blurred and gives a good indication of how the finished piece will look.
6: Final colours and effects.
Exactly as the title suggests. This is the most frustrating part of the piece as it seems you're SO nearly there, and yet I would say only 60% of the work is done. Blend blend blend my friend. Unless you want a cell shading look, which I personally cannot pull off well at all. I use the SMUDGE tool at varying strengths, sizes etc depending on the part I'm smudging. Generally I use a smaller one for faces and skin so as to make the characters seem more 'real'. This is arduous, frustrating anf time consuming, and I often get bored at this point. Backgrounds are also added here, though I completely copped out with this one and just made a blurry purple mess that is supposed to look like magic. Then I sign it. Done.
I hope this was of some use to you people out there. I know I'm not the most amazing artist in the world, but I always find it nice if someone takes the time to ask you how you complete your work if you respond and give them an insight. So, yeh. This is how I work.
Trelawney is copyright to JK Rowling and Warner Brothers, art and 'tutorial' copyright me.
Image size
2298x2141px 1.8 MB
© 2010 - 2024 hollano
Comments5
Join the community to add your comment. Already a deviant? Log In
Oh my! This is really cool! This is kinda how I do my art videos!  (Wink)")